Tuesday, May 6, 2014

Reverse Confetti: Countdown to Confetti Day 2

Hello! Back for day 2, are ya? Well we have TWO MORE amazing Reverse Confetti sets to share with you today!


Today I have two cards, one for each of the new sets. First up is a card for the new set Label Me!


I stamped the flowers from Petals n' Posies and cut some of them out with the coordinating Petals n' Posies Confetti Cuts. Some of the flowers were stamped directly on the blue card panel. I stamped the frame and sentiment from Label Me on a label I cut out with the new coordinating Label Me Confetti Cuts. This is SUCH a fun label die, perfect size and will coordinate with may previous sentiments as well! This fabulous set also has several frame stamps to really offer many options. I finished the card off with a bow and some sequins.

Next up is a card using the new addition to the Key Words collection, You Make Me Smile!


I've got a lot of dies going on in this card, haha! The pink frame is from Love Note, the white setmiment panel is from Class act. The stars are from the new Oh my Stars! Confetti Cuts, and you can also see the new Doin' the Wave Confetti Cuts! After stamping the sentiment, I decided to add the star spray from Winning, I kinda love that stamp :)


I stamped the stars from Winning in white ink and then die cut the stars and layered them off centered a bit, so they look more dimensional. 

Here's a shot of the inside:


I think you are going to fall in love with this wave die, so many fun ideas!!!

Okay, well that's it for me today, you know what's next doncha? Gonna send you on over to the Reverse Confetti Blog to see Jen's amazing project as well as the link list of all the girls playing along today! Thanks for stopping by:)


Monday, May 5, 2014

Reverse Confetti: Countdown to Confetti Day 1

Hello there and welcome to Day 1 of Reverse Confetti's May Release! This is a very special release because it's the 1 year anniversary of Reverse Confetti! It's so hard to believe she's already a year old, time just zoomed by!


Today we're sharing peaks at 2 of the 6 sets being released on May 8th. I have a card to share using the new set Winning and matching Winning Confetti Cuts


This is SUCH a fun set, very versatile so you could use it for many, many occasions! I cut out the trophy with the Winning Confetti Cuts from some gold foil cardstock and popped it up on dimensionals. I stamped the starburst stamp three times around the trophy. The star border is another new item, the Oh My Stars! Confetti Cuts. This die set has three separate pieces. This border is just one of those pieces:)


That's all from me today, but make sure you pop on over to the Reverse Confetti Blog for all the anniversary deets! There are a few ways to win new stamps so go on over now! Thanks for coming by and I'll see you back here tomorrow:)


Thursday, May 1, 2014

Reverse Confetti May SFYTT

Howdy!!! LOL totally busted out my cowboy talk there ;) But for real, how are you??  Are you ready for a brand new sketch to try? How about this one from Reverse Confetti?


And my card, using Bebe Bunny!!


I colored her in with Copics and then paper pieced her dress to match some of the patterned paper I used. Then I cut her out so I could mount her on this scalloped frame from Love Note. The banner stamp is from Beautiful Banners and was cut out with the Beautiful Banners Confetti Cuts.  The sentiment is from Bebe Bunny


Hope you can play along with us this month, go check out the RC Blog for details on how to play along and what you could win!!

Thanks for stopping by today:)

BeBeProductGraphicSheet250

LoveNote

BeautifulBannersProductGraphicSheet250

BeautifulBannersConfettiCuts


Wednesday, April 30, 2014

Cards for Him Blog Hop

Hello there and welcome to the Cards for Him Blog Hop!

Cards For Him

Catherine has a brand new online class, featuring ideas and techniques for how to make great masculine cards! I don't know about you, but this has always been a struggle for me. I love my bright colors, my ribbons, buttons, flowers, etc. This class is going to be SO helpful, I can't wait to play with all the new techniques and ideas!

Our newest online class “Cards For Him” is now open for registration!  This is perfectly timed for Father’s Day which is right around the corner, but of course is great for masculine card ideas year-round.
We've joined forces with some of the companies and their designers that have products featured in our class for a Blog Hop to celebrate our newest release.  There are TEN FREE class registrations hidden along the hop, so make sure you leave comments along the way.
The more comments you make, the greater your chances are for winning! 
You have until 11:59 pm on May 2nd to leave a comment to be entered to win!  Winners will be announced at on May 3rd on Catherine's Blog.  


Here's a card I created using the "texture" techniques shared in the class. 


With Father's Day right around the corner, I thought I'd take this opportunity to get ahead of the game and make my Dad's card! I started by making my card base and then cut another piece of kraft cardstock to 4 x 5.25 inches. I slathered a thick layer of  Wendy Vecchi's white texture paste and let it dry for a few minutes, but not so long as to make it completely harden. I took out my Whole Lotta Dots set by Reverse Confetti and stamped it directly into the texture paste. It's a real shame that I ended up covering most of the dots because it looked SO AWESOME! You can still see a bit of the stamping in texture paste between the vellum sentiment panel and that hinge on the top. 


Make sure you clean the stamp off right away, don't want any of that paste to dry on and potentially ruin your precious stamp! Next step was to spray the piece with some Dylusions inks. I love these things, and you can tell I went a little nuts with it ;)

I got out some chipboard letters and, with glossy accents, glued them together to form the word "Dad" vertically. Actually, before I glued them, I distressed them with Tea Dye distress inks. The hinges are from Tim Holtz. They come in a regular chipboard color, so I added some paints and inking, and then sanded them a bit to age them. I still didn't quite get the color I wanted, but I still quite like how they turned out!

Next up, I had to figure out a way to add "Happy Father's Day" without covering too much of my card. Solution: Reverse Confetti's Lighthearted Letters to the rescue! I stamped them in a straight line (well, straight enough anyway lol) on a piece of vellum, trimmed the piece down to just the letters, and then inked the edges. I added a glue dot to each end of the sentiment and wrapped it around to the other side of the kraft panel so I didn't have to try to figure out how to adhere it on the front and not have adhesive showing. 


That's all I have to share today! I think I'm going to need to try out some other techniques now that I tried this texture technique. Once you get the hang of masculine cards, it gets a little easier (just don't grab your girly buttons or ribbon, in fact lock them away so you're not tempted, haha!)

Ready for the blog hop list?  Grab a cup of coffee and buckle up!  You are in for a treat, we've got tons of inspiration in store for you! Next up after me is Lisa Henke!!

*Start here!* Catherine Pooler    http://catherinepooler.com/2014/04/cards-for-him-blog-hop
Sandy Allnock  http://wp.me/p2kUof-32k

Sarah Gough  http://thinkingstamps.blogspot.com/


Friday, April 25, 2014

Verve Stamps April Release Blog Hop

Hi there! Welcome to the Verve Stamps April Release Blog Hop! Today, the team is sharing cards using a couple new compilation sets from Verve! The first one is Petals and Wings, which is a retake on an old favorite, with a few little changes. The other, is a brilliant new set called Die Sidekicks! Every stamp in this set has a matching die that you probably already own:) Lets get started!


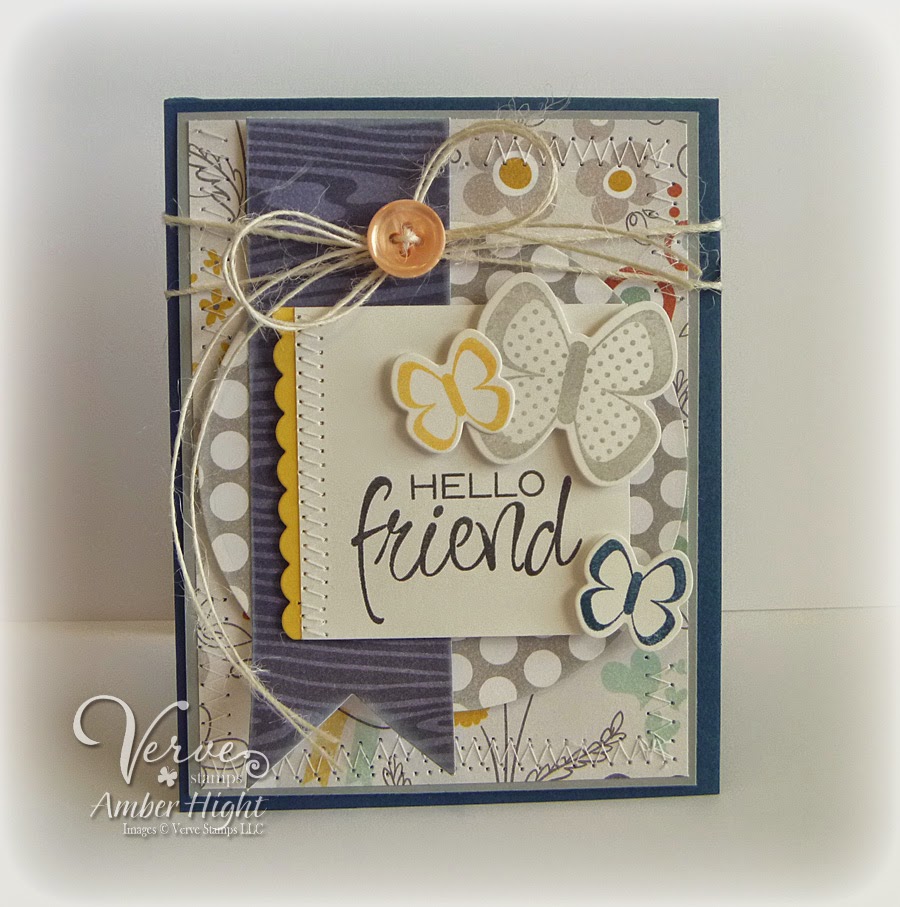
First up, I have a card using one of the new Plain Janes, this is Hello Friend! 


The Plain Jane is actually one of the stamps from Happy Hello, but blown up to a fun, focal point size. I also used the butterflies from Petals and Wings, stamped in gray, yellow, and navy ink. The layout for this card was inspired by the newest Freshly Made Sketches #133 sketch.

Next up is a card I made using the butterflies from Die Sidekicks! This is one of my favorite cards ever, love how it turned out!


I found a picture on Pinterest that I absolutely LOVED, so I tried to remake it. Here is the original image:


I think I got pretty close, don't you?:) Like I said, the butterflies are from Die Sidekicks, but so are the scroll and the basket, which I made by cutting the Sweet Scallop Tag in half and flipping the top upside down. You'll also see some new sequins! These babies are SUPER shiny, fabulous!


I had so much fun watecoloring with this next one that I finally had to pull myself away and stop adding to it! This card uses the butterflies from Die Sidekicks and another new Plain Jane, Being Awesome!


I embossed the butterflies in black ink on Tim Holtz watercolor paper and then just started painting the butterflies in. I didn't do it cleanly, and didn't want to! I love the way the color bleeds all over the card, I even had to add some paint specks by flicking by paint brush. I didn't want to cover ANY of this card so I kept it really simple by just adding the sentiment on a strip of vellum. I wrapped the sides of the vellum around to the inside of the card so I didn't have to find a way to adhere it to the card front.


Well that's it from me! Now you're on your way to Andrea's Blog!! 

 
Hop List:
1. Julee7. Jen
2. Amber8. Laurie
3. Andrea9. Marisa
4. Charmaine10. Maureen
5. Christyne11. Stacey
6. Janelle12. Teresa


Thursday, April 24, 2014

Thanks Bunches!

Good morning! I have a quick little card to share using Petals n' Posies from Reverse Confetti!


I had actually started this card back when we were just releasing this stamp set, and set it aside because I wasn't feeling it. Yesterday I pulled it back out and was determined to make it work because I love these colors and those giant chevrons :)


I cut a bunch of flowers from the Petals n' Posies Confetti Cuts and then stamped the coordinating Petals n' Posies stamps in different colored inks. I stamped one sentiment and embossed it in white on the black cardstock, and the other sentiment was stamped on a tag cut out with the Tag Me Confetti Cuts. I added some buttons, twine, rhinestones, and a little sewing to finish it off.

That's all I have for today, thanks for stopping by!


Wednesday, April 16, 2014

Reverse Confetti ~ April Color Challenge


Hi there! I'm back today with MORE Reverse Confetti to share! Today is the first day of our April Color Challenge and you won't want to sit this one out. Check out these fun, springy colors!


Here's my card using the newly released Carton Cuties


I wanted to make my Easter eggs speckled, and achieved this look by putting down some watercolor on watercolor paper, spritzing it when it was dry with more paint, and got this cool splotchy look! They almost look like those malted milk balls...mmmm....chocolate...oh sorry, distracted myself:)


I wanted my background cardstock to mimic the speckled look, so I cut three strips of matching cardstock and then smooshed them around in some watercolor to get the same effect.


As I mentioned, the egg, cartons, and sentiment are from Carton Cuties (cut out with matching Carton Cuties Confetti Cuts) and the banner stamp and die from Beautiful Banners and coordinating Beautiful Banners Confetti Cuts. That's it from me today, make sure to stop by the Reverse Confetti Blog for a list of designers with projects to share with you! Thanks for stopping by today:)

Tuesday, April 15, 2014

Curtain Call ~ Confetti Crush!

Hi there! I have a fun card to share today, using inspiration from this weeks Curtain Call Challenge! Reverse Confetti is sponsoring this week, and I think you can see why:)


https://scontent-a.xx.fbcdn.net/hphotos-frc3/t1.0-9/10153026_10203480903732020_65793724_n.jpg

I was really inspired to make some confetti on my card, so here's what I came up with!


I just punched out some circles from different colors of cardstock with some punches and dies. I also snuck a few sequins in as well:) The sentiments are all from Lots to Say by Reverse Confetti. I cut my "Just a Note to Say" stamp into two pieces because I commonly use these in seperate pieces anyway! This way, I was able to bend the to fit the curve of the circles.


Make sure to check out the challenge this week and play along! Thanks for visiting today:)


Tuesday, April 8, 2014

Reverse Confetti - April Blog Hop

Hi there! So happy to be here today with a card for the April Blog Hop! We always have our crew, plus some friends join in, so there is a ton of inspiration to be had today!


The hop started over on the Reverse Confetti blog so it would be worth your while to go back if you've just stumbled on my blog, that way you don’t miss a thing! (wow, run on sentence much? Ha! I'm too tired to reword it!) We have tons of inspiration for you to see using all of Reverse Confetti’s amazing stamp sets!


I pulled out a couple sets for this card, Beautiful Banners and Petals 'n Posies. I wanted to keep my colors sort of muted on this card, not really sure why cause I love COLOR but I was feeling neutral this time, haha!


I cut out some flowers with the Petals 'n Posies Confetti Cuts, as well as the leaf. I stamped the coordinating images from the Petals 'n Posies stamp set and then layered them together.


The sentiment and banner stamp are from Beautiful Banners and cut out with the coordinating Beautiful Banners Confetti Cuts.

I hope you’ve enjoyed hopping with us today. Be sure and hop with us on the 8th of EVERY MONTH for more Reverse Confetti inspiration! Now it’s time to hop on over to Lisa Addesa’s blog. If you get lost along the way, you can find the hop order and list of all the participating designers over on the Reverse Confetti blog.

How would you like to win some Reverse Confetti goodies of your very own? Leave a comment on each stop along the way for a chance to win a $15 gift certificate to Reverse Confetti. Comments are open until Thursday, April 10 at noon CST, and the winner will be announced on the Reverse Confetti Blog!

A few things before you hop along though, just to keep you “in the know”…
April’s SKETCH FOR YOU TO TRY is open for you to play along. Click HERE for a chance to win. AND, be on the lookout for another great COLOR challenge on April 16th and another way to win!

Celebrate the creative side of you!

PetalsPosiesProductGraphicSheet250

PetalsNPosiesConfettiCuts

BeautifulBannersProductGraphicSheet250

BeautifulBannersConfettiCuts